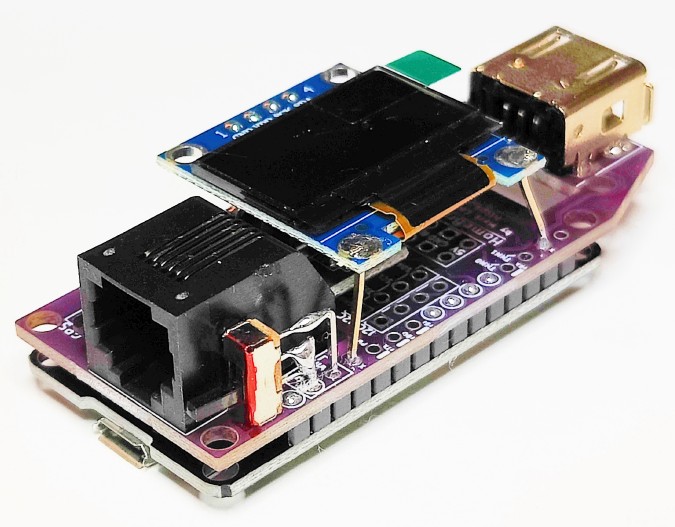
This third-generation (Gen3) design, for interfacing to the AUX bus of a Celestron computerized telescope mount, is known as the "HomeBrew Gen3", or "HBG3" for short. It is the culmination of several years of experimentation and earlier attempts. The Gen3 hardware uses active 5V TTL drive with current-limiting resistors to make it 100% electrically safe -- safer and more compatible than some of Celestron's own products! This design works with any Celestron telescope mount that has an AUX port, even the ancient Nexstar GPS mount.
The basic HBG3 is a combination of a custom Printed Circuit Board (PCB), and a 30-Pin ESP32 DevKit-v1 module running special firmware, along with various switches and connectors etc. It is intended as a DIY project (more on this below). The PCBs, kits, and possibly assembled/tested units are available from (email) hbg3@pobox.com -- see below.
See the HomeBrew Gen3 thread on CloudyNights for development and discussion of the design.

What Does It Do?
The HBG3 is a small electronic accessory that connects to an AUX (or hand-controller) port of a Celestron Telescope mount.
It provides multiple ways for computers, smartphones, and tablets to connect to and control the mount with CPWI,
SkyPortal, or SkySafari+/Pro software:
Unlike other third-party (eg. SkyFi) modules, the HBG3 does not connect through a hand-controller, and does not require a separate power supply or battery. It instead plugs directly into the mount, and is powered by the mount, just like Celestron's own accessories. It draws very little power though, so no worries about that! Use of Celestron Firmware Manager (CFM) is not tested and not supported with an HBG3 attached (too risky!).
What Else Can It Do?The HBG3 has a plethora of other useful capabilities, including GPS ("SkySync"), a Nunchuck (thumbstick) interface, OLED display, Smart 2X DewHeater controller, Focus-Motor emulation and control, Wireless Bridging, Standalone Focus Motor control, mount-simulator, workarounds for Celestron bugs, etc. If a GPS receiver is wired to the HBG3, and the mount already has a GPS receiver built-in, please see here for how to avoid issues.
Where Do I Get One?The HomeBrew Gen3 is intended as a DIY project, and the schematic and Open Source source code (click to download) are freely available.The HBG3 PCB makes things easy, and is manufactured with all of the SMDs (surface-mounted devices) already installed by the factory, leaving only simple, through-hole soldering of a few parts to complete the project. The PCBs, kits, and possibly assembled/tested units are available from (email): hbg3@pobox.com That email goes to a couple of nice blokes in the UK who have volunteered to produce the PCBs and kits for others, relieving me of such duties. I get nothing back in return from them, other than the satisfaction of seeing the project continue and become more widely available.
If (and only if) you happen to be located in Canada, then you may instead email me
(Mark Lord The assembly pictorial has been updated, now showing the latest PCB, OLED display, and GPS module.
The Blue switch should be down, closest to the PCB, for normal operation.
When it is up, away from the PCB, this selects Mount-USB (MUSB) mode and also turns off WiFi, Bluetooth, and the USB Serial/Debug interface..
The Red switch is used to select between the two WiFi modes.
Using the Celestron terminology, Down means "Direct Connect mode", where the HBG3 acts as a SoftAP or WiFi Server.
Up means "Access Point mode", where the HBG3 will become a client of some other existing WiFi network,
after first configuring the SSID/passkey for such using one of the apps.
If your HBG3 has v8.1 or newer firmware already, there is now a built-in OTA Firmware Updater. This can be accessed from the OLED display, or from the serial/debug monitor with the "ota_update" command. No need to install anything else to perform firmware updates!
For this to work, the HBG3 needs internet access using "Access Point" mode for WiFi.
See here for WiFi instructions.
Unlike Celestron's updates, updating the HBG3 firmware is safe and cannot result in a "bricked" unit.
Otherwise, a complete self-contained build system for building/uploading the firmware from source code is also available:
MS-Windows users will need to install (only once, ever) the included Serial Port driver
from the CP210x_Universal_Windows_Driver sub-folder (or from here).
Right-click on the silabser.inf file, and click INSTALL.
You should now be able to connect the HomeBrew USB to the PC and see it be assigned a COM port.
Now run the arduino.exe program from the HBG3_Arduino folder. The Arduino IDE will then start up.
From it's File menu, select Sketchbook, and then the version of Firmware that you want, eg. hbg3_v8.70.
A new window will pop open with the HBG3 source code shown. Close the old/original window now.
Under the Tools menu, select the appropriate COM port for your
connected HBG3. Now click on the UPLOAD button near top left. The system should
automatically build the code and send it to your HBG3. If uploading fails before 100%, just click it again to retry. Done.
An alternative method for one-time updating from firmware older than v8.1 on MS-Windows, might be to install/use the ESP32 binary flasher.
HBG3 Standalone Focus Motor Controller with 12V feed-through power and red Nunchuck.
|